Ans.
There are three ways you can rename a worksheet
a.
Double-click on one of the existing worksheet names.
b.
Right-click on an existing worksheet name, then choose Rename from the
resulting Context menu.
c. Select
the worksheet you want to rename (click on the worksheet tab) and then select
the Sheet option from the Format menu. This displays a submenu from which you
should select the Rename option.
Q2. What are the two ways of
referencing cells in other worksheets?
Ans. Two ways to reference cells in other
sheets: by entering the formula directly using the keyboard or by using the
mouse.
Q3. Differentiate between Relative and absolute hyperlinks.
Ans. Hyperlinks can be used in Calc to jump to
a different location from within a spreadsheet. An absolute link will stop
working only if the target is moved. A relative link will stop working only if
the start and target locations change relative to each other. For instance, if
you have two spreadsheets in the same folder linked to each other and you move
the entire folder to a new location, a relative hyperlink will not break.
Q4. List the procedure involved in
Linking HTML Tables to Calc Worksheet.
Ans. You can insert tables from HTML documents, and data located within
named ranges from an OpenOffice.org Calc or Microsoft Excel spreadsheet, into a
Calc spreadsheet.
We can do
this in two ways: using the External Data dialog or using the Navigator.
Using the External Data dialog
a. Open the Calc worksheet where the external
data is to be inserted. This is the target worksheet.
b. Select the cell where the external data is
to be inserted.
c. Choose Insert -> Link to External Data.
d. On the External Data dialog, type the URL of
the source worksheet or click the […] button to open a file selection dialog.
Press Enter to get Calc to load the list of available tables.
e. In the Available tables/range list, select
the named ranges or tables you want to insert. You can also specify that the
ranges or tables are updated every (number of) seconds.
f. Click OK to close this dialog and insert the
linked data.
Q5.
What is the purpose of adding comments?
Ans. Comments are mostly used in shared Calc
sheet which is used to explain the changes made in the sheet to the author of
the sheet.
Q6. How can we add comments to the
changes made?
Ans. Comments can be added as follows:
1. Make the change to the spreadsheet.
2. Select
the cell with the change.
3. Choose Edit > Changes > Comments. The
automatically-added comment provided by Calc appears in the title bar of this
dialog and cannot be edited.
4. Type your own comment and click OK.
After you have added a comment to a changed
cell, you can see it by hovering the mouse pointer over the cell.
Q7. What are Macros?
Ans. A macro is a saved sequence of commands or
keystrokes that are stored for later use. Macros are especially useful to
repeat a task the same way over and over again.
Q8. How can we record a Macro?
Ans. Steps
to record macro are as follows
a. Use Tools
> Macros > Record Macro to start the macro recorder. The Record Macro
dialog is displayed with a stop recording button.
b. Perform the actions you want to be recorded
in the document.
c. Click Stop Recording.
d. The Macro dialog appears, in which
you can save and run the macro.
Fill in the blanks.
1. At the bottom of each worksheet window is
a small tab that indicates the name of
the worksheets in the workbook.
2. A cell
reference refers to a cell or a range of cells on a
worksheet and can be used to find the values or data that you want formula to
calculate.
3. Spreadsheet software allows the
user to share the workbook and place it in the Networklocation
where several users can access.
4. Spreadsheet software can find
the changes by Comparing Sheets.
5. Macros are useful to repeat a
task the same way over and over again.
Notes on Ch.2 Electronic Spreadsheet
SESSION
1: Analyze data using SCENARIOS AND GOAL SEEK
Data Consolidation
allows you to gather together your data from separate worksheets into a master
worksheet. In other words, the Data Consolidation function takes data from a
series of worksheets and summaries it into a single worksheet.
STEPS
for Data Consolidation are :
1) Open the
worksheet that contains the cell ranges to be consolidated.
2) Choose the
Consolidate option under the Data menu.
3) Select
Source data range and click Add. The selected range now appears on the
Consolidation ranges list.
4) Select
additional ranges and click Add after each selection.
5) Specify
where you want to display the result by selecting a target range from the Copy
results to box.
6) Select a
function from the Function list. The Sum function is the default setting.
7) Select
either Row labels or Column labels. The text in the labels must be identical in
all the specified Source range.
8) Click OK
to consolidate the ranges.
NOTE : Use Data > Define
Range to give name to a range
Creating Subtotals :
SUBTOTAL,
totals/adds data arranged in an array—that is, a group of cells with labels for
columns and/or rows. Using the Subtotals dialog, you can select arrays, and
then choose a statistical function to apply to them. It is accessible from Data
menu.
Steps to insert subtotal values
into a sheet:
1) Ensure
that the columns have labels.
2) In the
Subtotals dialog , in the Group by box, select the column that you want to add
the subtotals to.
3) In the
Calculate subtotals for box, select the columns that you want to subtotal.
4) In the
Use function box, select the function.
5) Click OK.
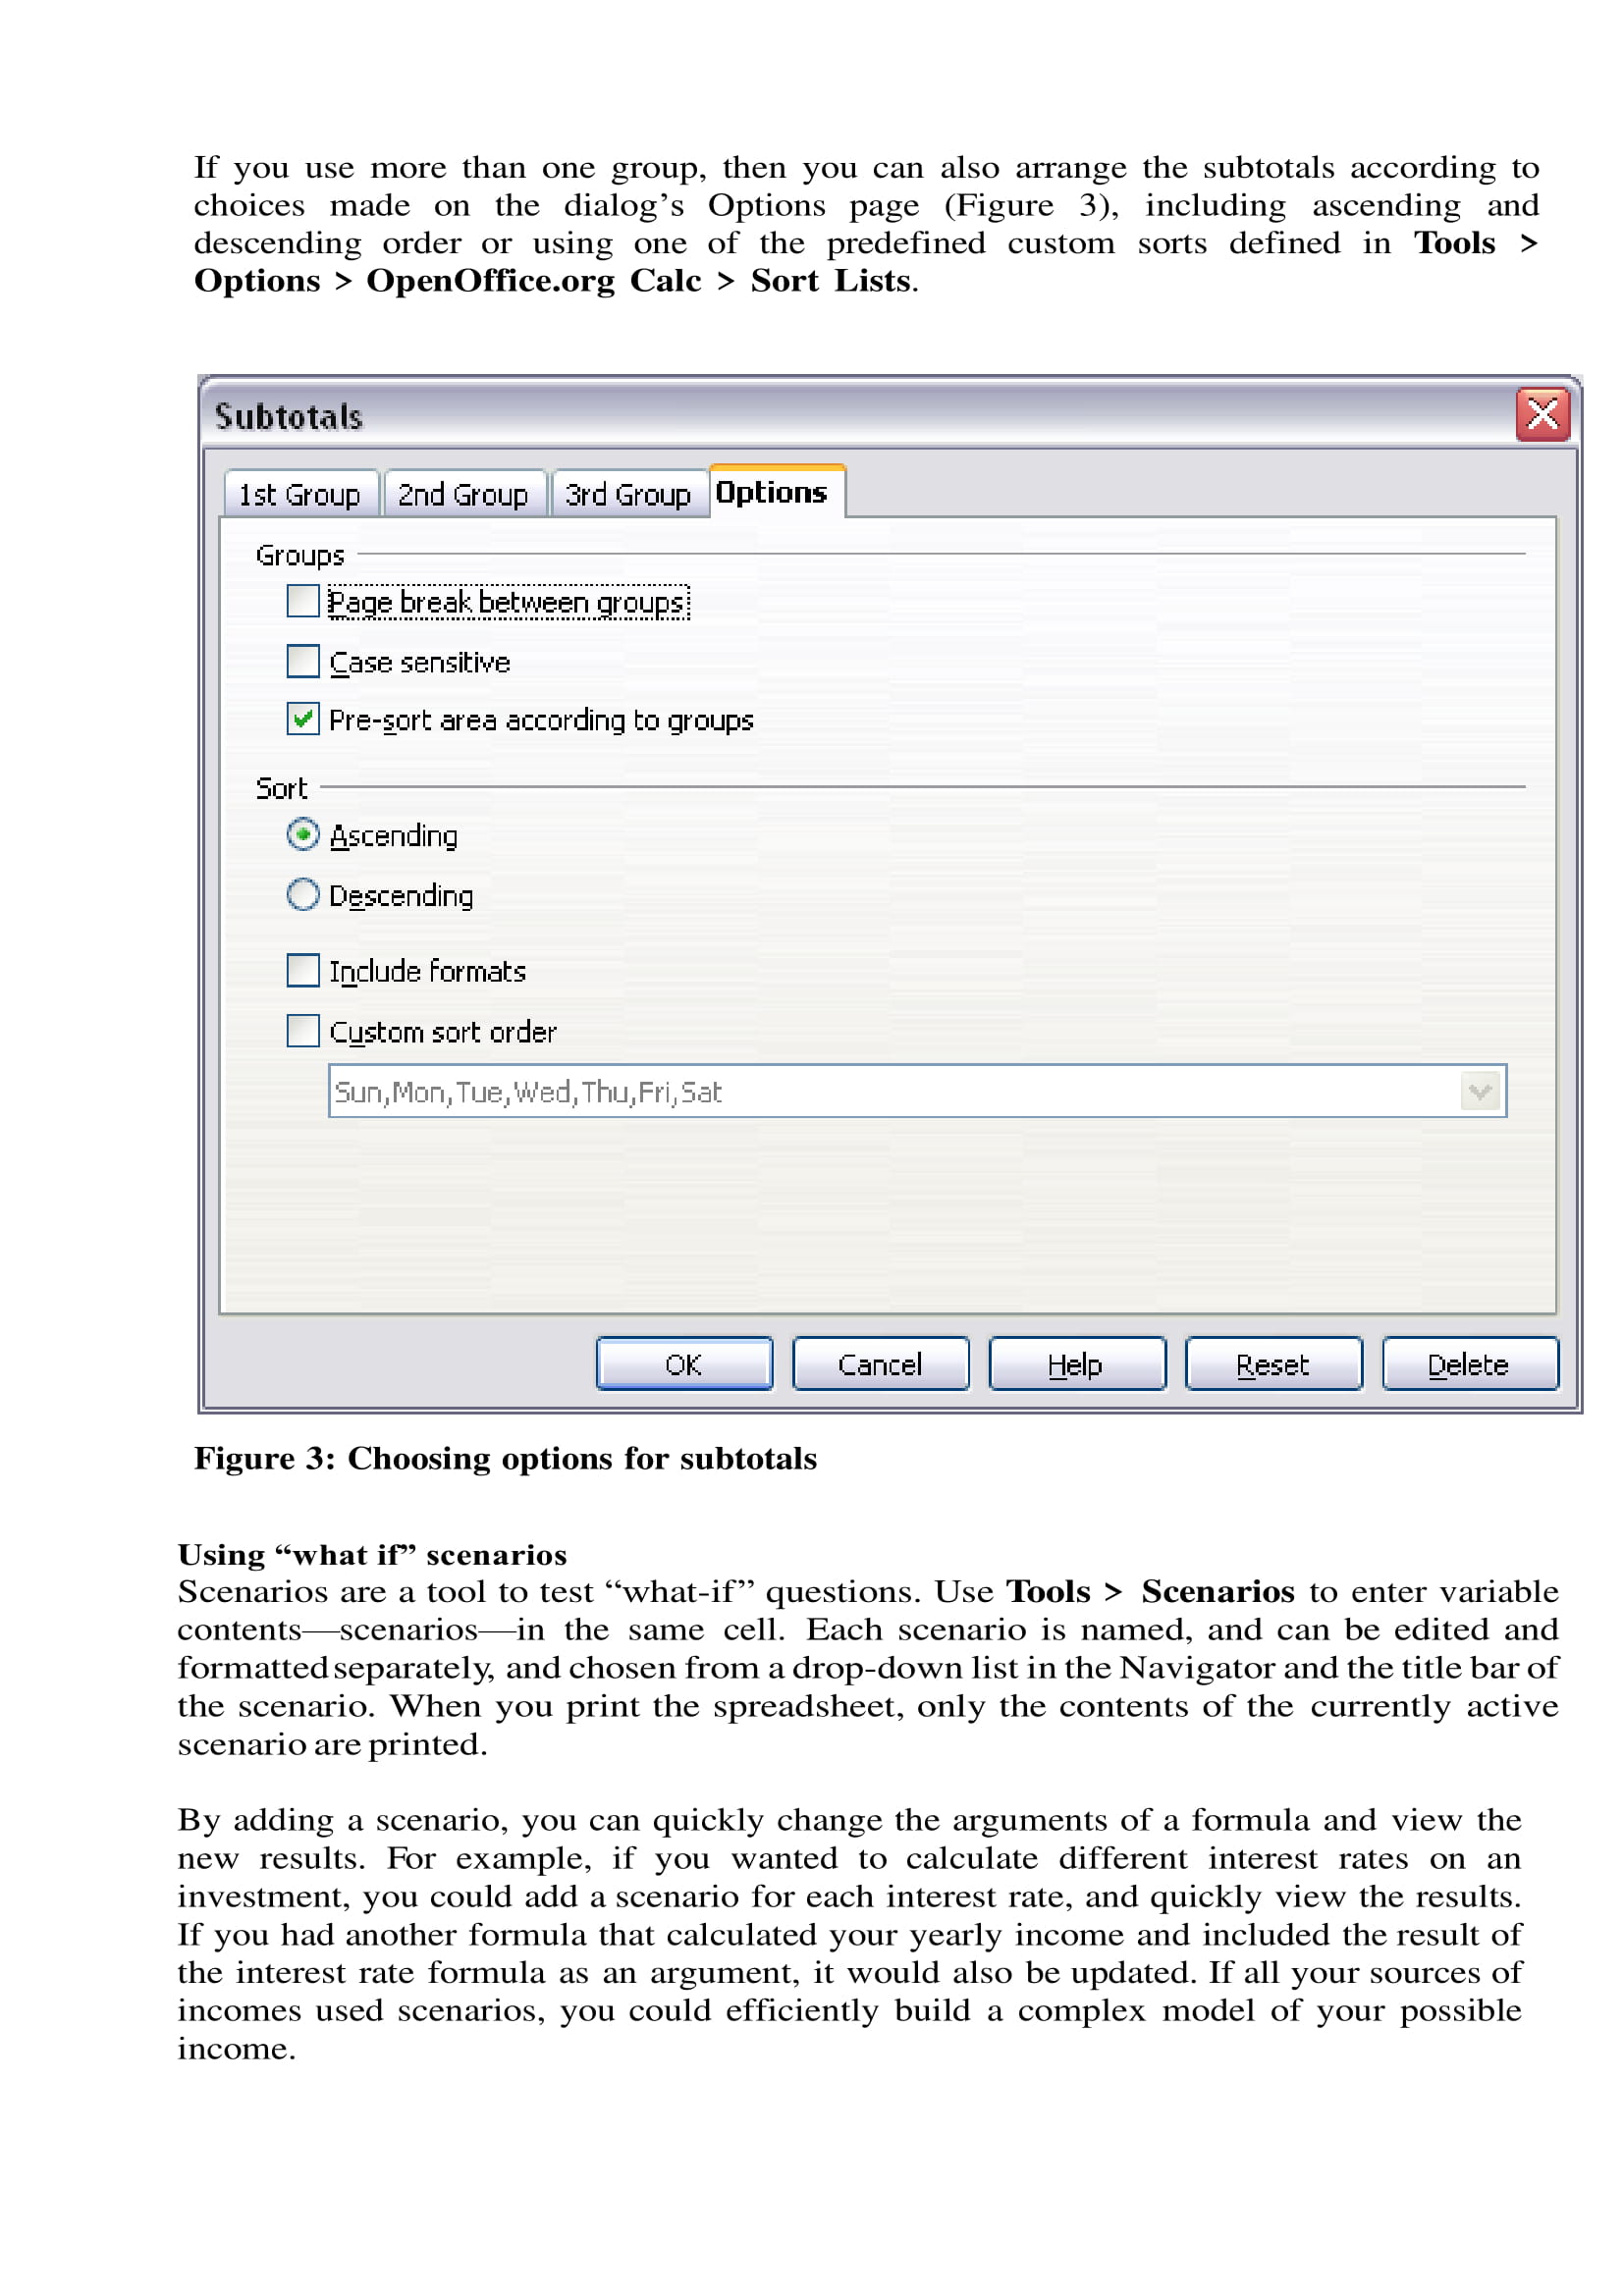
Using “What If” Scenarios :
Scenarios
are a tool to test “what-if” questions. Each scenario is named, and can be
edited and formatted separately. You can easily switch between different
scenarios by using the Navigator. For example, if you wanted to calculate the
effect of different interest rates on an investment, you could add a scenario
for each interest rate, and quickly view the results.
Creating Scenarios :
1) Select
the cells that contain the values that will change between scenarios.
2) Choose
Tools > Scenarios.
3) On the
Create Scenario dialog , enter a name for the new scenario. This name is
displayed in the Navigator and on the title bar of the scenario.
4)
Optionally add some information to the Comment box.
5)
Optionally select or deselect the options in the Settings section.
6) Click OK
to close the dialog
NOTE : You can create several
scenarios for any given range of cells
Goal Seek
Usually, you
run a formula to calculate a result based upon existing values. By contrast
Goal Seek option under Tools menu, helps to find values which will produce the
result that you want. for example
Chief
Financial Officer has a good idea of the company’s income in the first three
quarters, because of the contracts that are already signed. For the fourth
quarter, however, no definite income is available. So how much must the company
earn in Q4 to reach its goal? Then Chief Financial Officer runs a goal seek on
the empty cell for Q4 sales and receives the answer
Solver :
Solver
option under Tools menu amounts to a more elaborate form of Goal Seek. The
difference is that the Solver deals with equations with multiple unknown
variables. It is specifically designed to minimize or maximize the result
according to a set of rules that you define.
Session
2 : Link Data and Spreadsheets Using Multiple Workbooks and Linking Cells
Spreadsheet
allows you to link the cells from various worksheets to summarize data from
several sources. In this manner, you can create formulas using a combination of
local and linked information. Multiple sheets help to keep the information organized.
Inserting New Sheets
When you
open a new spreadsheet, by default, it has a sheet named Sheet1. There are
several ways to insert a new sheet. The first step, in all cases, is to select
the sheet that will be next to the new sheet. Then do any of the following:
Select
Insert > Sheet from the menu bar, or
Right-click
on the tab and select Insert Sheet, or
Click in an
empty space at the end of the line of sheet tabs.
Each method
opens the Insert Sheet dialog box where you can choose to put the new sheet
before or after the selected sheet and how many sheets to insert.
Renaming Sheets
There are
three ways you can rename a worksheet. You can do any of the following:
Double-click
on one of the existing worksheet names.
Right-click
on an existing worksheet name, then choose Rename from the resulting Context
menu.
Select the
worksheet you want to rename (click on the worksheet tab) and then select the
Sheet option from the Format menu. This displays a submenu from which you
should select the Rename option.
Cell Reference: A cell
reference refers to a cell or a range of cells on a worksheet that can be used
in a formula to calculate values.
Referencing Other Sheets
There are
two ways to reference cells in other sheets :
1) By
entering the formula directly using the keyboard. :
Typing the
reference is simple once you know the format the reference takes. The reference
has three parts to it: Path and file name . Sheet name . Cell name The general format for the reference is =’file:///Path &File Name’#$SheetName.CellName
2) By using
the mouse.
Hyperlinks :Hyperlinks can be used in Calc to jump to a
different location from within a spreadsheet to other parts of the same file or
to different files or even to web sites.
Hyperlinks
can be stored within your file as either relative or absolute
An absolute
link will stop working only if the target is moved. A relative link will stop
working only if the start and target locations change relative to each other.
For instance, if you have two spreadsheets in the same folder linked to each
other and you move the entire folder to a new location, a relative hyperlink
will not break.
You can
insert and modify links using the Hyperlink dialog. To display the dialog,
click the Hyperlink icon on the Standard toolbar or choose Insert >
Hyperlink from the menu bar.
Linking To External Data :
You can
insert tables from HTML documents, and data located within named ranges from an
OpenOffice.org Calc or Microsoft Excel spreadsheet, into a Calc spreadsheet You
can do this in two ways: using the External Data dialog or using the Navigator
Using the External Data dialog: Steps are
Open the
Calc worksheet where the external data is to be inserted. This is the target
worksheet.
Select the
cell where the upper left-hand cell of the external data is to be inserted.
Choose
Insert -> Link to External Data.
On the
External Data dialog, type the URL of the source worksheet
In the
Available tables/range list, select the named ranges or tables you want to
insert.
Click OK to
close this dialog and insert the linked data.
Linking To Registered Data
Sources :
You can
access a variety of databases and other data sources and link them into Calc
worksheets. First you need to register the data source with OpenOffice.org. To
register a data source that is in *.odb format:
Choose Tools
-> Options -> OpenOffice.org Base -> Databases.
Click the
New button to open the Create Database Link dialog.
Enter the
location of the database file, or click Browse to open a file browser and select
the database file.
Type a name
to use as the registered name for the database and click OK.
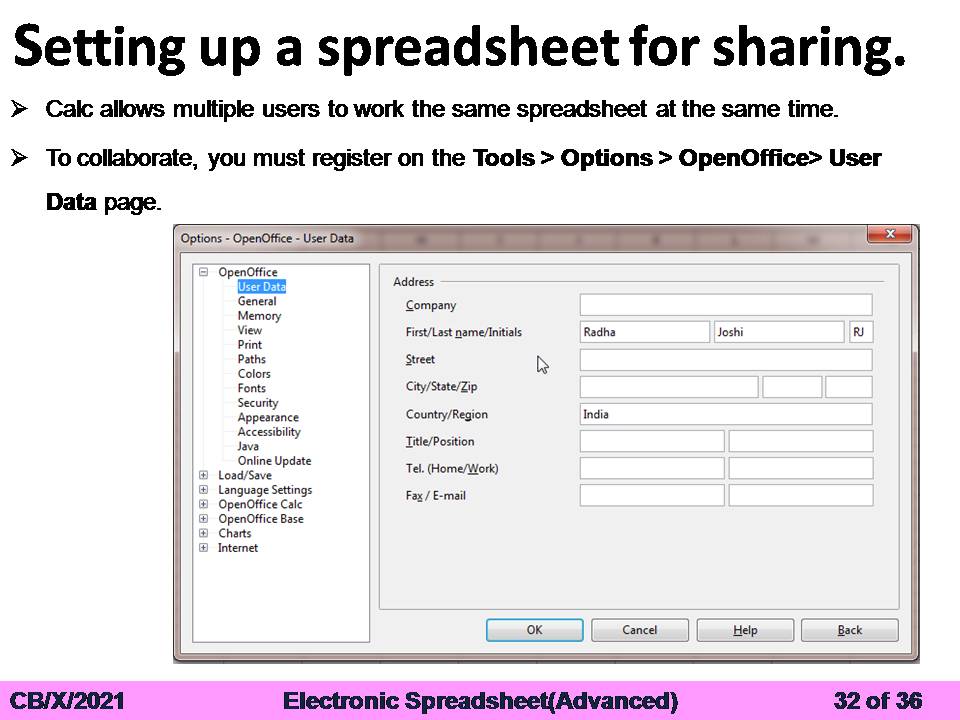
SESSION 3: SHARING WORKSHEET DATA
Spreadsheet
software allows the user to share the workbook and place it in the network
location where several users can access it simultaneously. This is required to
either speed up data entry or simply make things easier for collaboration
purposes.
Setting Up A Spreadsheet For
Sharing :
Open the
spreadsheet document , choose Tools > Share Document to activate the
collaboration features for this worksheet. A dialog opens where you can choose
to enable or disable sharing.
To enable
sharing, select the box at the top of the dialog, and then click OK. A message
appears stating that you must save the worksheet to activate shared mode. Click
Yes to continue. The word (shared) is then shown on the title bar after the
worksheet’s title.
Saving A Shared Spreadsheet :
When you
save a shared spreadsheet, one of several situations may occur:
If the
worksheet was not modified and saved by another user since you opened it, the
worksheet is saved.
If the
worksheet was modified and saved by another user since you opened it, one of
the following events will occur:
If the
changes do not conflict, the worksheet is saved, the dialog below appears, and
any cells modified by the other user are shown with a red border.
If the
changes conflict, the Resolve Conflicts dialog is shown. You must decide for
each conflict which version to keep, yours or the other person’s. When all
conflicts are resolved, the worksheet is saved.
If another
user is trying to save the shared worksheet and resolve conflicts, you see a
message that the shared spreadsheet file is locked due to a merge-in in
progress.
Note: Most spreadsheets
software automatically turns off some features in shared workbooks to simplify
the workbook since multiple people can be working on the file at the same time.
For example, shared workbooks don‘t allow merging cells, conditional formatting,
or inserting pictures/graphs/etc
Record Changes :
Calc has the
feature to track what data was changed, when the change was made, who made the
change and in which cell the change has occurred. for example
If you are
the sponsor of a youth baseball team. The coach has submitted a budget to you
and you are concerned that the coach won’t see the changes you made, So you
decided to use Calc with the record changes feature turned on, so that the
coach can easily see the changes you have made.
How to turned on Record Changes
feature ON :
Open the
Shared Spreadsheet.
Select Edit
> Changes > Record from the menu bar.
Begin
editing the worksheet.
NOTE :A red colored border, with a dot in the upper
left-hand corner, appears around a cell where changes were made.
Viewing Changes :
Calc allows
you to control what changes you see when reviewing a worksheet. To change the
available filters, select Edit > Changes > Show You can filter based on:
Date – Only changes made in a certain time
range are displayed.
Author – Only changes made by a specific author
are displayed.
Range – Only changes made in a specific range
of cells are displayed.
Comment – Searches the content of the comments
and only displays changes which have comments.
Show accepted changes – Only changes you accepted are
displayed.
Show rejected changes – Only changes you rejected are displayed
Adding Comment to a Change :
Make the
change to the spreadsheet.
Select the
cell with the change.
Choose Edit
> Changes > Comments.
Type your
own comment and click OK.
NOTE : You can see the comment by hovering the
mouse pointer over the cell.
Editing Comment :
Select the
cell with the comment that you want to edit.
Select Edit
> Changes > Comments.
Edit the
comment and click OK.
Accepting or Rejecting Changes :
When
you receive a worksheet back with changes. Now, as the original author, you can
step through each change and decide which change to accept and which one to
reject. To begin this process:
Open the
edited worksheet.
Select Edit
> Changes > Accept or Reject.
Calc steps
through the changes one at a time. You can choose to accept or reject each
change
Merging Worksheets :
Sometimes,
multiple reviewers return edited versions of a worksheet at the same time. In
this case, Calc provides the feature of merging worksheets
Open the
original worksheet.
Select Edit
> Changes > Merge Document.
A file
selection dialog opens. Select a file you want to merge and click OK.
Accept or
Reject Changes dialog opens and you can accept or reject the changes.
NOTE : Changes from different authors appear in
different colors in the worksheet.
Comparing Documents :
When sharing
worksheets reviewers may forget to record the changes they make. Calc can find
the changes by comparing worksheets.
In order to
compare worksheets you need to have the original worksheet and the one that is
edited. To compare them:
Open the
edited worksheet that you want to compare.
Select Edit
> Compare Document.
An open
worksheet dialog appears. Select the original worksheet and click Insert.
Calc finds
and marks the changes
SESSION 4: CREATE AND USE MACROS IN SPREADSHEET
Macro :
A macro is a
saved sequence of commands or keystrokes that are stored for later use. Macros
are especially useful to repeat a task the same way over and over again
Using the macro recorder :
Use Tools
> Macros > Record Macro to start the macro recorder. The Record Macro
dialog is displayed with a stop recording button. Click Stop Recording to stop
the macro recorder.
Advantages of using Macro in Calc :
Macros
automates the repetitive and routine tasks.
Macros speed
up your process and reduce time.
Ch.1 Digital
Documentation
Extra Worksheet
Q1.
A _________ is a set of formats that you can apply to selected pages,
text, frames.
a.
Style
b.
Template
c.
Image
d.
Graphics
Q2.
We can quickly change the appearance of documents by applying styles.(T/F)
a.
True
b.
False
Q3.
Which of the following styles is not offered by OpenOffice.org?
a.
Page Style
b.
Frame Style
c.
Presentation Style
d.
Video Style
Q4.
Which of the style include header and footers, border, margins.
a.
Character Style
b.
Page Style
c.
Frame style
d.
Presentation Style
Q5.
Which style affect the selected text such as font size, bold and italics
format?
a.
Cell Styles
b.
Numbering Styles
c.
Character Styles
d.
Frame Styles
Q6.
What is the shortcut for opening styles and formatting window?
a.
F12
b.
F8
c.
F11
d.
F10
Q7.
Styles and Formatting Window is available in ______ menu.
a.
Format
b.
Insert
c.
Tools
d.
View
Q8.
Fill Format mode help to apply styles to many different areas quickly.(T/F)
a.
True
b.
False
Q9.
When Fill Format mode is active, _____ click undo last Fill Format action.
a.
right and left
b.
left
c.
right
d.
None of the above
Q10.
To quit Fill Format mode press the ____________ key.
a.
Enter
b.
Ctrl
c.
Shift
d.
Escape
Write Down Answers in Brief :
1.What
do you mean by Style?
2.Write
four types of styles ?
3.Anil
is working in a company and he has to invite all his colleagues(approximately
100) on his marriage anniversary. He wants to write a personalized letter to
all. Which feature of Writer will help him to create all the letters quickly.
4.Explain
the following filters :
a)Invert
b)Smooth
c)Aging
d)Posterize
5.Write two ways of
creating templates.
6.What does the following
button represent in the entries tab of Insert Index/Table dialog box?
a)E#
b)E
c)T
d)#
Notes on Digital Documentation
SESSION 1: CREATE AND APPLY STYLES IN THE DOCUMENT
A style is a set
of formats that you can apply to selected pages, text in your document to
quickly change their appearance. Advantages of using Style are :
1. Styles help us to apply consistent formatting
to the documents.
2. Style make the major formatting changes simple.
3. Using styles we can easily change the existing
format.
OpenOffice.org supports the following types of styles:
1) Page styles include margins, headers and
footers, borders and backgrounds.
2) Paragraph styles control all aspects of a paragraph’s
appearance, such as text alignment, tab stops, line spacing etc.
3) Character styles affect selected text within a
paragraph, such as the font and size of text, or bold and italic formats.
4) Frame styles are used to format graphic and
text frames.
5) Numbering styles apply similar alignment,
numbering or bullet characters, and fonts to numbered or bulleted lists.
6) Cell styles include fonts, alignment, borders,
background and cell protection.
7) Graphics styles in drawings and presentations
include line, area, shadowing, transparency etc.
8) Presentation styles include attributes for
font, indents, spacing, alignment, and tabs.
Apply Style
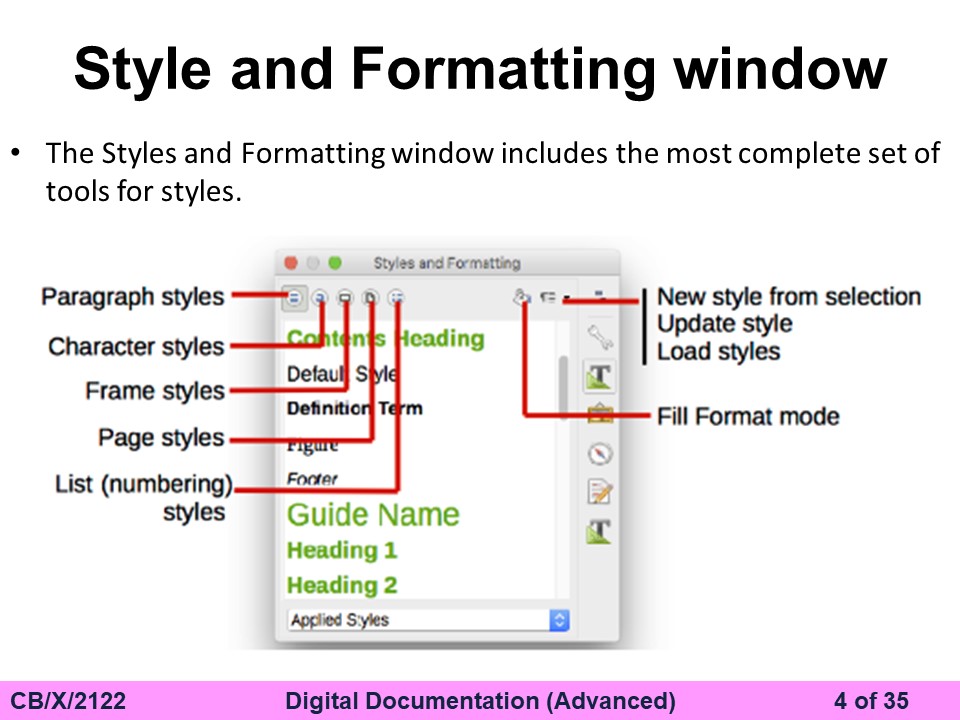
using Styles and Formatting window
1 Click Format > Styles and Formatting or press F11.
2. The Styles and Formatting window shows the types of
styles available for the OpenOffice.
3. Click on any one of the icons to display a list of styles
in a particular category.
4. Position the insertion point in the paragraph, frame, or
page, and then double-click on the name of the style which you want to apply.
Apply Style using Fill
Format mode
1) Open the Styles and Formatting window and select the
style you want to apply.
2) Click the Fill Format mode icon.
3) To apply a paragraph, page, or frame style, hover the
mouse over the paragraph, page, or frame and click.
NOTE : Fill Format mode is quite useful when you need
to format many scattered paragraphs, cells, or other items with the same style.
Creating New (Custom)
Styles:
We can create New Styles in
two ways
1) Creating a new style from a
selection: Steps are as follows
a) Open the Styles and Formatting window and choose the type
of style you want to create.
b) In the document, select the item you want to save as a
style.
c) Click on the New Style from Selection icon from the
Styles and Formatting window.
d) Type a name for the new style and Click OK to save the
new style.
2) Dragging And Dropping To Create
A Style
Select some text and drag it to the Styles and Formatting
window. If Paragraph Styles are active, the paragraph style will be added to
the list. If Character Styles are active, the character style will be added to
the list.
Modifying Custom or Pre
defined Styles :
OpenOffice.org provides several ways to modify styles (both
the predefined styles and custom styles that you create):
A) Updating A Style From A
Selection : To update a style from a selection follow the
following steps:
1. Open the Styles and Formatting window
2. Select an item from the document whose format you want to
adopt as a style.
3. In the Styles and Formatting window, select the style you
want to update , then click on the arrow next to the New Style from Selection
icon and click on Update Style.
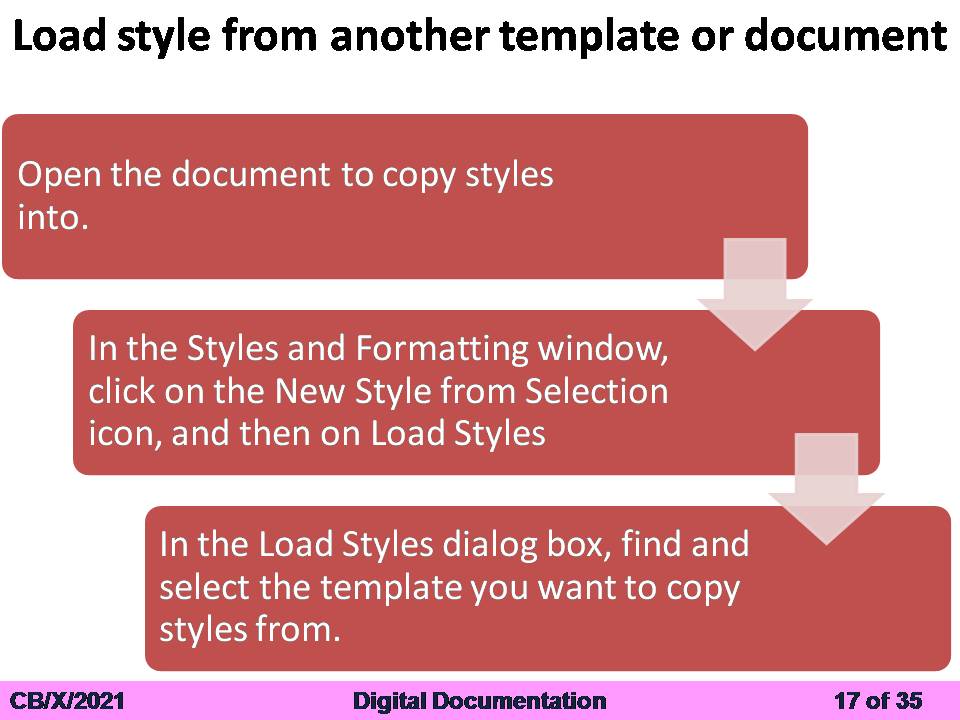
B) Loading Styles From A Template
Or Document :
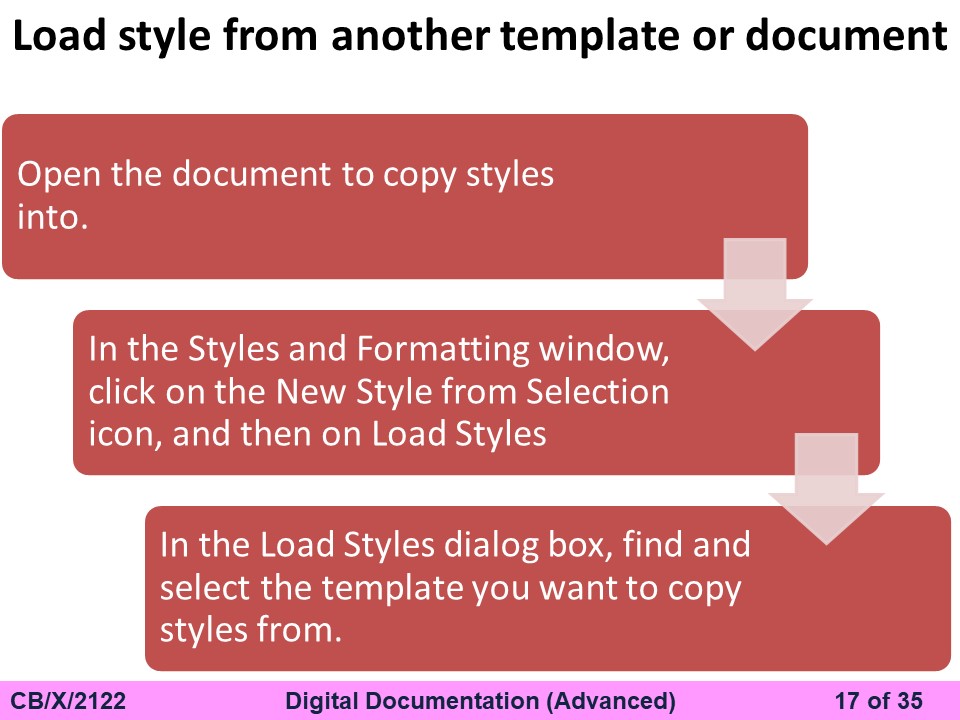
1. Open the document you want to copy styles into.
2. In the Styles and Formatting window, long-click on the
arrow next to the New Style from Selection icon, and then click on Load Styles.
3. Load style dialog box appears.
4. Select the categories of styles to be copied.
5. Click OK.
SESSION 2. INSERT AND
USE IMAGES
INSERT IMAGE:
Images can be added to a document in several ways: by
inserting an image file, directly from a graphics program or a scanner, or from
the Open Office Gallery.
1. Inserting An Image
File :
When the image is in a file stored on the computer, you can
insert it into an Open Office document using either of the following methods :
A. Drag and Drop
1. Open a file browser window and locate the image you want
to insert.
2. Drag the image into the Writer document and drop it where
you want it to appear.
B. Insert Picture Dialog
1. Click in the Open Office document where you want the
image to appear.
2. Choose Insert > Picture > From File from the menu
bar.
3. On the Insert Picture dialog , select the file to be
inserted and click Open.
2. Inserting An Image From
The Clipboard :
a. Open the source document and the target document.
b. In the source document, select the image and press Ctrl +
C to copy image.
c. Switch to the target document and place the cursor where
the image is to be inserted.
d. Press Ctrl + V to paste the image.
3. Inserting An Image Using
A Scanner :
If a scanner is connected to your computer Open Office can
call the scanning application and inserted the scanned item into the document.
To start this procedure, select Insert > Picture > Scan > Select
Source.
4. Inserting An Image From
The Gallery :
a) To open the Gallery, click on the Gallery icon or choose
Tools > Gallery
b) Select the image from the Gallery.
c) Drag image from the Gallery into the Writer document or
right-click on the picture and choose Insert>Copy
MODIFY IMAGE :
When you insert a new image, you may need to modify it to
suit the document. We can modify image by using Picture toolbar, resizing,
cropping etc
1. Using The Picture
Toolbar :
When you insert an image or select one already present in
the document, the Picture toolbar appears. You can set it by clicking View >
Toolbars > Picture. Two other toolbars can be opened from this one: the
Graphic Filter toolbar and Color Toolbar.
From these three toolbars, you can apply small corrections
to the graphic or obtain special effects.
Graphics mode : You can
change color images to grayscale by selecting the image and then selecting
Grayscale from the Graphics mode list
Flip vertically or horizontally
: To flip an image vertically or horizontally, select the image, and then
click the relevant icon.
Filters : Following
Table provides a short description of the available filters. Feel free to
experiment with the different filters and filters settings. You can undo all
the changes by pressing Ctrl+Z or Alt+Backspace or by selecting Edit > Undo.
Transparency : Modify
the percentage value in the Transparency box on the Picture toolbar to make the
image more transparent. This is useful for creating a watermark.
2. Cropping Images :
When you are only interested in a section of the image for
the purpose of your document, you may wish to crop (cut off) parts of it. To
start cropping the image, right click on it and select Picture from the pop-up
menu. In the Picture dialog box, select the Crop page
In the Crop page, you can control the following parameters:
Keep scale / Keep image size :
When Keep scale is selected (default), cropping the image does not change the
scale of the picture. When Keep image size is selected, cropping produces
enlargement , shrinking , or distortion of the image so that the image size
remains constant.
3. Resizing Image :
Steps to resize the image in Writer
are –
Click the picture, to show the green resizing handles.
Position the pointer over one of the green resizing handles.
Click and drag to resize the picture.
Rotating a Picture : Writer
does not provide a tool for rotating a picture; however, there is a simple
workaround:
Open a new Draw or Impress document.
Insert the image you want to rotate.
Select the image and select the Rotate icon from the Drawing
toolbar.
Rotate the image as desired.
Select and Copy the rotated image and paste it in Writer
document.
Creating Drawing Objects :
We can draw the object using drawing toolbar by clicking
View > Toolbars > Drawing. Steps to To use a drawing tool are :
Click in the document where you want to insert the object.
Select the tool from the Drawing toolbar.
Click and drag to create the drawing object.
After inserting the object You can change the properties
(fill color, line type and weight, anchoring, and others) of the drawing object
using the Drawing Object Properties toolbar.
Grouping Drawing Objects :
Steps to group drawing objects are :
Select one object, then hold down the Shift key and select
the others you want to include in the group.
Choose Format > Group > Group from the menu
bar or right-click and choose Group > Group from the pop-up menu.
Positioning Image/Graphics Within
The Text :
When you add a graphic to a text document, you need to
choose how to position it with respect to the text and other graphics.
Positioning of a graphic is controlled by four settings
1 Arrangement refers to the placement of a graphic on an
imaginary vertical axis.
2. Alignment refers to the vertical or horizontal placement
of a graphic in relation to the chosen anchor point.
3. Anchoring refers to the reference point for the graphics.
This point could be the page, or frame. An image always has an anchor point.
4. Text wrapping refers to the relation of graphics to the
surrounding text, which may wrap around the graphic on one or both sides.
SESSION : 3 CREATE AND USE TEMPLATE
A template is a model that you use to create other
documents. For example, you can create a template for business reports that has
your company’s logo on the first page. New documents created from this template
will all have your company’s logo on the first page.
Creating a Template :
Template can be created in two ways
:
1. Creating a template from a
Document : Steps to create template from a document are –
a) Open a new or existing document of the type you want to
make into a template (text document, spreadsheet, drawing, presentation).
b) Add the content and styles that you want.
c) From the main menu, choose File > Templates > Save
, to open template dialog box.
d) Type a name for the new template.
e) Select the category in which you want to assign the
template.
f) Click OK to save the template.
2. Creating a template using a
wizard: Steps to create template using a wizard are –
a) From the main menu, choose File > Wizards >[type of
template required]
b) Follow the instructions on the pages of the wizard.
c) In the last section of the wizard, you can specify the
name and location for saving the template.
Setting a custom template as the default
To set a custom template as the default:
From the main menu, choose File > Templates >
Organize. The Template Management dialog opens.
In the box on the left, select the folder containing the
template that you want to set as the default, then select the template.
Click the Commands button and choose Set As Default Template
from the drop-down menu.
SESSION 4. CREATE AND
CUSTOMIZE TABLE OF CONTENTS
Creating a Table of Contents
Writer’s table of contents feature lets you build an
automated table of contents from the headings in your document. For example,
you can use the Heading 1 style for chapter titles and the Heading 2 and
Heading 3 styles for chapter subheadings.
Steps to create Table of Content are :
Place the cursor in the document where you want the table of
contents to be inserted.
Select Insert > Indexes and Tables > Indexes and
Tables
Click OK.
Using the Index/Table tab :
Use the Index/Table tab to set the table’s
attributes like
Adding A Title : If you’d like the table of
contents to have a title, enter it in the Title field.
Protecting Against Manual Changes : To protect the
table of contents from being changed accidentally, check the Protected against
manual changes check box.
Changing The Number Of Levels : By default, Writer
evaluates 10 levels of headings. To change the number of levels evaluated,
enter the desired number in the Evaluate up to level spin box
Using The Entries Tab
Use the Entries tab, to format the entries in the table of
contents. For each outline level, you can add and delete elements, such as
chapter numbers, and you can also apply character styles to individual
elements.
The Structure line displays the elements for entries in that
level. Each button on the Structure line represents one element:
The E# button represents the chapter number.
The E button represents the entry text.
The T button represents a tab stop.
The # button represents the page number.
The LS button represents the start of a hyperlink. (This
button doesn’t appear on the default Structure line.)
The LE button represents the end of a hyperlink. (This
button doesn’t appear on the default Structure line.)
Deleting Elements : To
delete an element from the Structure line, click the button that represents
that element and then press the Delete key on your keyboard.
Adding Elements : To
add an element to the Structure line, follow these steps:
Place your cursor in the white field to the left of where
you want to insert the element.
Click one of the five buttons that are just below the
Structure line. (For example, to add a tab stop, click the Tab stop button.) A
button representing the new element appears on the Structure line.
Applying Character Styles : To
apply a character style to an element on the Structure line:
On the Structure line, click the button that represents the
element to which you want to apply a style.
From the Character Style drop-down list, select the desired
style. Writer applies the selected style to the selected element.
Using The Styles Tab :
Use the Styles tab, to apply paragraph styles to the table
of contents. You can apply a different paragraph style to each outline level of
the table.
To apply a paragraph style to an outline level, follow these
steps:
In the Levels list box, select the desired outline level.
2. Click the paragraph style that you want to apply.
3. Click the < button to apply the selected paragraph
style to the selected outline level.
To remove paragraph styling from an
outline level:
1) In the Levels list box, select the desired outline level
by clicking it.
2) Click the Default button.
Using The Background Tab :
Use the Background tab, to add color or a graphic to the
table background.
Adding Color : To
add color to the background of the table of contents, simply click the desired
color in the color grid.
Adding A Graphic : To
add a graphic to the background of the table of contents, follow these steps:
From the As drop-down list, select Graphic. The Background
tab displays the graphics options.
Click the Browse button.
Find the graphic file that you want to use and then click
the Open button.
In the Type area of the Background tab, choose how you want
the background graphic to appear:
To position the graphic in a specific location in the
background, select Position.
To stretch the graphic so that it fills the entire
background area, select Area.
To repeat the graphic across the entire background area,
select Tile
Deleting Color Or Graphics : To delete color or
graphics from the table background, follow these steps:
From the As drop-down list, select Color.
Click No Fill on the color grid.
Editing A Table Of Contents :
To edit an existing table of contents:
Click anywhere in the table of contents and then right
click. The context menu appears.
From the context menu, choose Edit Index/Table. The Insert
Index/Table window opens and you can edit and save the table.
Update Table of Content :
If you add or delete text (so that headings move to
different pages) or you add, delete, or change headings, you need to update the
table of contents. To do this
Place the cursor within the table of contents.
Right-click and select Update Index/Table from the pop-up
menu.
Deleting A Table Of
Contents ::
To delete the table of contents from a document:
Click anywhere in the table of contents and then right
click. The context menu appears.
From the context menu, choose Delete Index/Table. Writer
deletes the table of contents.
SESSION 5. IMPLEMENT
MAIL MERGE
A mail merge is a way to take a letter you’ve written and
send it to a whole bunch of people, personalizing it with information about
them so they might think that you typed that letter personally for them.
A mail merge can also be a quick way to take a list of
people’s mailing addresses and generate labels or envelopes with the address
for a different person on each label or envelope.
Create a Mail Merge Document:
Letter
1. Open a template, or create a new Writer document.
2. Save the document with the appropriate name with
extension .odt or .ods
3. Write out the text that will be going to everyone, and
plan where you want the fields.
To Make The Data Source And
Entering Data
1. Choose File > New > Database
2. Select the type of data: spreadsheet data, text file data
or the type of database you’re using like Access or mySQL.
3. Click Next
Merging The Data Source With Main
Document
1. Open the letter you want to use.
2. Once you have the letter then insert the fields from the
database at specific position by dragging the fields.
3. If you want a field in the letter twice, you can drag it
twice.
4. Format the document any way you want it.
5. The last step is to either print the letter to a printer,
or “print” to a Writer file so you can see all the data merged.
Editing a saved file of mailing
labels
To edit a saved file of mailing labels, open the saved label file in the normal
way. You will be prompted to update all links. Choose No for the following
reason: The first label on the page is termed the “Master Label” and all other
labels are linked to it. If you update the links, then all labels will end up
containing the same data.
Printing Mailing Labels
Before beginning this process, note the brand and type of
labels you intend to use. To prepare mailing labels for printing:
1. Choose File > New > Labels.
2. On the Options tab, ensure that the Synchronize contents
option is selected.
3. Select Database, Table, label Brand, and label Type
4. Click the Labels tab and move fields from Database field
list to Label text area.
5. Choose File > Print. The message shown in appears.
Click Yes to print.
6. In the Mail Merge dialog ( ), Click OK to send the labels
directly to the printer
Textbook Question ansers
Q1. What are Styles ? What are the
advantages of using styles?
Ans.
A style is a set of formats that you can apply to selected pages, text, frames,
and other elements in your document to quickly change their appearance.
Advantages
of using styles are :
1.
Styles help us to apply consistent formatting to the documents.
2.
Using styles we can easily change the existing format.
3.
Styles makes major formatting changes simple.
Q2. Give any four styles supported by
OpenOffice.org
Ans.
Four Styles supported by OpenOffice.org are.
1.
Page styles include margins, headers and footers, borders and backgrounds.
2.
Paragraph styles control all aspects of a paragraph’s appearance, such as text
alignment, tab stops, line spacing, and borders.
3.
Character styles affect selected text within a paragraph, such as the font and
size of text, or bold and italic formats.
4.
Numbering styles apply similar alignment, numbering or bullet.
Q3. How can we create our own styles?
Ans.
We can create new styles by following two ways :
1.
Creating new styles from selection.
2.
Dragging And Dropping To Create A Style.
Q4. Explain any four Graphic filters.
Ans.
Four graphic filters are :
Invert
: Inverts the color values of a color image or the brightness values of a
grayscale image.
Smooth
: Softens the contrast of an image.
Sharpen
: Increases the contrast of an image.
Posterize
: Makes a picture appear like a painting.
Q5. Explain Image Cropping.
Ans.
When you are interested in a section of the image for the purpose of your
document, you may wish to crop (cut off) parts of it. Right click on image and
select Picture from the pop-up menu. In the Picture dialog box, select the Crop
page and select the part from left, right, top and bottom which you want to
remove.
Q6. List any three methods of inserting images in a text document.
Ans. Three
methods of inserting images in a text document are :
a. Drag and
Drop
b. Inserting
An Image From The Clipboard
c. Inserting
An Image Using A Scanner
Q7. What do you understand by the terms:
a. Text Wrapping
b. Anchoring
Ans. Text
wrapping refers to the relation of graphics to the surrounding text, which may
wrap around the graphic on one or both sides, be overprinted behind or in front
of the graphic.
Anchoring :
IT refers to the reference point for the graphics. This point could be the
page, or frame where the object is. An image always has an anchor point.
Q8. What are templates? What are the advantages of using templates?
Ans. A
template is a model that you use to create other documents. For example, you
can create a template for business reports that has your company’s logo on the
first page. When you create a new documents from this template will all have
your company’s logo on the first page.
One of the
major advantages of using templates is the ease of updating styles in more than
one document. Another advantage is that it also saves your time.
Q9. What is the difference between styles and templates?
Styles
Templates
A style is
a set of formats that you can apply to selected pages, text,
frames, and other elements in your document to
quickly change their appearance.
A template
is a model that you use to create other documents.
Styles
help to keep formatting consistent in the entire document
Templates
help to keep formatting consistent across multiple documents
Ans.
Q10. Explain different ways of creating a template
Ans.
Templates can be created in the following two ways
1. Creating A Template From A Document
To create a
template from a document:
a. Open a
new or existing document of the type you want to make into a template
b. Add the
content and styles that you want.
c.From the main menu, choose
File > Templates > Save.
d. The
template dialog box open.
e. Type the
name of the template.
f. Click OK
to save the new template
2. Creating A Template Using A Wizard
a. From the
main menu, choose File > Wizards >[type of template required]
b. Follow
the instructions on the pages of the wizard.
c. In the
last section of the wizard, you can specify the name and location for saving
the template.
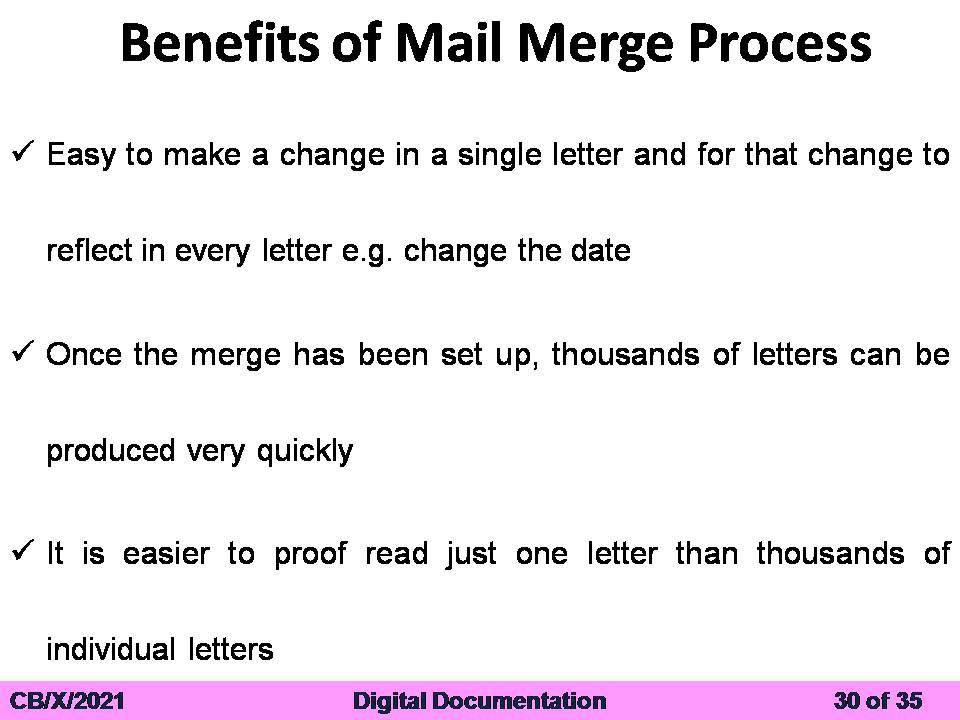
Q11. Explain Mail Merge.
Ans. A mail
merge is a way to take a letter you’ve written and send it to a whole bunch of
people, personalizing it with information about them so they might think that
you typed that letter personally for them. In short, it’s a way to be personal,
yet efficient.
Q12. What are advantages of Mail Merge?
Ans.
Advantages of mail merge are :
1.It saves our time and efforts.
2.It helps to create multiple personalized
letters in a very less time.
3.It also help
to keep the formatting consistent in all the letters.
Q13. Give examples of databases in which the Data Source can be
created.
Ans.
Databases in which the Data Source can be created are :
1.MySQL
2. MS – Access
3. OpenOffice base
4. Oracle
Digital
documentation
1. What are styles? What are the advantages of
using styles?
2.How
can we create our own styles?
3.List
any three methods of inserting images in a text document.
4.What
do you understand by the terms:
a.Text
Wrapping
b.Anchoring
5.What
are templates? What are the advantages of using templates?
6.What
is the difference between styles and templates?
7.Create
table of contents for your project.(write down steps as answer)
8.Create
a document in Word on a topic of your choice of minimum 10 pages. .(write down
steps as answer)
9.Format
the document with various fonts (minimum 12, maximum 15) and margins (minimum
2, maximum 4).
The document should include a)A
bulleted or numbered list
b) A
table containing relevant details
The document should include a) A
bulleted or numbered list
b) A
table containing relevant details
The document should include a) A
bulleted or numbered list
b) A
table containing relevant details
c) A picture of lion using clip art gallery
d) An
example of word art
e) A
header with student name & date
f) A
footer with pagination
1.Create
a table of contents for this document. .(write down steps as answer)
Digital
documentation
1.What are styles? What are the
advantages of using styles?
2.How
can we create our own styles?
3.List
any three methods of inserting images in a text document.
4.What
do you understand by the terms:
a.Text
Wrapping
b.Anchoring
5.What
are templates? What are the advantages of using templates?
6.What
is the difference between styles and templates?
7.Create
table of contents for your project.(write down steps as answer)
8.Create
a document in Word on a topic of your choice of minimum 10 pages. .(write down
steps as answer)
9.Format
the document with various fonts (minimum 12, maximum 15) and margins (minimum
2, maximum 4).
The document should include a) A
bulleted or numbered list
b) A table containing relevant details
c) A picture of lion using clip art gallery
d) An example of word art
e) A header with student name & date
f) A footer with pagination
1.Create
a table of contents for this document. .(write down steps as answer)